
Recreating the Texture, Shape, and Color of a Natural Tooth
Luke Kahng
One of the hardest tasks a technician is ever given is matching a single anterior restoration to the patient’s existing dentition. Everything that enters into the equation must be considered carefully: shade, hue, value, translucency, and symmetry. The perfect restoration is not an accident; rather, it is the culmination of years of learning, days of work, and hours of observation. The study and understanding of natural teeth will aid a technician greatly when he wants to re-create what he sees in a patient’s mouth.
This article explores the use of studying natural teeth to perfect and further enhance the dental technician’s education regarding his craft.
UNDERSTANDING THE NATURAL TOOTH
It is always difficult to match a single anterior tooth to the adjacent natural teeth. However, if the dental technician looks at natural teeth while at the same time studying and analyzing what is in the patient’s mouth, he or she will be able to create a more perfect match. Understanding a natural tooth’s anatomic features, shading, surface texture, and natural segmentation creates a perfect equation for success. If the case is returned to the laboratory because it does not match the patient’s natural shade, it is a big source of frustration to the technician. The questions raised are: what was missing—and what caused it to be missing? What was the technician’s state of mind when he or she took the shade? Was he or she tired? Or, is it a porcelain or material problem? Conversely, if a prosthesis is absolutely right on, it makes everybody’s day. When the patient is especially happy, it makes the technician and clinician proud of the work they have completed.
CLINICAL EXAMPLE
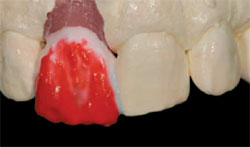
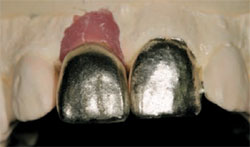
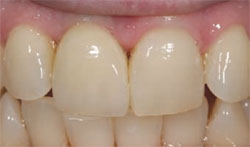
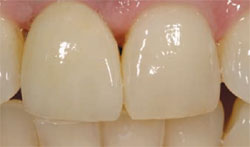
The photographs in Figure 1 and Figure 2 demonstrate that, given the proper room proximally, facially, lingually, and incisally, better color matching can be achieved. This is because there is more space in the mouth, allowing for several layers of porcelain. The position of the implant was also checked so that the GC Aadva zirconium abutment (GC Advanced Technologies, Costa Mesa, CA) would be properly milled to get a better coping.
When the patient came to the laboratory for a custom shade, his adjacent tooth, No. 9, was studied to get a proper match. Questions asked were: What does that tooth look like? What is the entire value—high or low? How much translucency? Where will it be applied?
Studying tooth No. 9 (Figure 1) indicated that the gingival one third had a slightly higher value with a white fluorescent and translucent color. There was a little bit of an orange hue in the mesial, distal, and incisal edge portions and the middle third horizontally was slightly textured. The occlusal view of the patient’s mouth (Figure 2 ) indicated that teeth Nos. 7 and 10 were slightly out of alignment. This had implications for the crown’s positioning, affecting the contour, shape, color, and harmony of the finished restoration because the guide form was irregular. The technician needed to make the restoration slightly "off" to have proper matching and blending and had to decide whether or not to create a contour build-up.
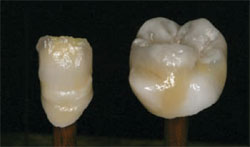
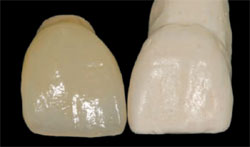
By studying extracted, sectioned natural teeth (Figure 3) donated by a clinician, the technician is told a story of coloring and segmentation. Upon removing the enamel, it becomes clear whether there is a gray or a white band inside the tooth. This can then be checked against the crown. This particular natural tooth was selected for this case because the shade in the gingival area matched the patient’s, which could be mimicked by copying the internal coloring. On the photograph’s right is half of a GC Aadva crown (GC Advanced Technologies), displayed for matching purposes. This crown was one of two finished restorations prepared for this case.
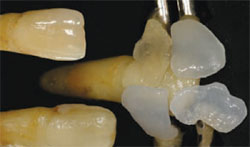
A similar study can be performed on restorations made with different material types. There are two types of crowns pictured in Figure 4 () —both sectioned for layering evaluation. The two on the left are Captek™ crowns (Precious Chemicals Company, Alamonte Springs, FL) and the right two are made with metal-free zirconia.
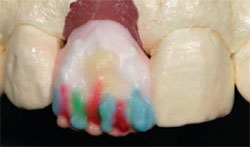
In addition to a natural tooth (Figure 5, upper left ) and a natural tooth prepared by the technician (Figure 5, lower left ), this photograph demonstrates a laboratory test conducted with custom porcelain shade tabs layered on top of each other on a prepared natural tooth. The upper left-hand tab is a cervical translucency tab; to its right is a clear fluorescent. The bottom left is an enamel opal tab and to its right is a translucency neutral. It is time-consuming to layer the tabs but worth it overall because the final outcome is a better color match. When the tabs are put together in different layering methods over the porcelain, they present a double-check system for a final shade match.
Another laboratory test was conducted to test the porcelain system and to compare appearances (Figure 6 ). Figure 7 () demonstrates another test, this time under ultraviolet lighting to pay special attention to translucency. After running these different laboratory tests, the technician will have a better understanding of colors and how they should be applied. The more understanding a technician has regarding aspects of color, the better the final restoration will be.
After taking the custom shade, the technician can generate a custom-made computer shade map (Figure 8 ) of the patient’s personal color guide. Based on the placement of the lines the technician has drawn and how thin or thick they are, the replication is graphed and duplicated into a picture of the patient’s tooth on the computer. The numbered areas in the photograph represent dentin modifier, enamels, translucency modifier, cervical translucency, and opaque dentin. They will serve as a roadmap of the patient’s internal and external color guide.
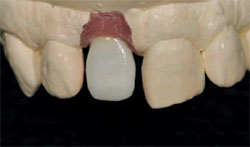
The modified and stained GC Aadva zirconia crown’s initial cover was checked on the model for fit (Figure 9). A zirconia coping, soft and without internal color, is compared for educational purposes to a coping modified with porcelain for color duplication (Figure 10). In Figure 11 , basic B-2 dentin modifier along with enamel opal and cervical translucency were applied based on the computer-generated shade-mapping guide placement in Figure 8. After the first bake at 890° C, a porcelain check was performed (Figure 12 ). It was then decided that more porcelain would need to be added. A side-view of the second build-up (Figure 13 ), with translucency modifier applied, helped the technician to decide how to proceed, because over-grinding will lead to an inability to see the build-up accurately. After this observation, a decision was reached about whether to proceed by over- or under-building the restoration. Figure 14 ( ) gives a view of the second build-up after-bake at 887° C.
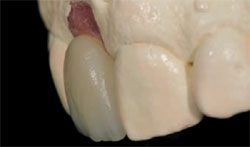
At last, in Figure 15 ( ), we have a view of the final porcelain with enamel and enamel opal applied for the third bake, as well as the silver powder application for surface texture check in (Figure 16 ). Figure 17 ( ) shows an interesting texture check test with the zirconia crown on the left and a technician-made die—with the root—of tooth No. 9 on the right. With this experimental restoration, the emergency profile, lobe texture, and horizontal and vertical lines can all be checked. The ceramic crown presented with more reflection because the surface of the stone is flatter. From the gingival to the incisal edge and the mesial to the distal surface, by mimicking the adjacent tooth with a man-made model, the technician can be more certain of a perfect fit.
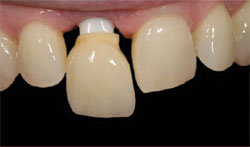
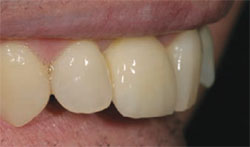
A try-in for color and shape double-check (Figure 18 ) precedes the final cementation (Figure 19 ) and an immediate post-operative shot (Figure 20 ). Our duty as technicians is to fabricate a crown so natural and life-like that the patient cannot tell the difference between the natural tooth and the restoration. We are able to check for color, inclination, and harmony, as well as blending of the patient’s two centrals (Figure 21 ) in the side view.
CONCLUSION
The perfect matching of a single anterior restoration is not an accident. It requires a lot of time and effort on everyone’s part. Even with all of the time devoted to a case like this, a restoration might require a slight touch-up in shading, known as custom staining.
Patients worry about the amount of time they must spend involved with the custom shading/staining process because their schedules are busy and they have commitments elsewhere. But when they see the results of the dentist’s and technician’s labor, they are usually happy that they devoted the time necessary to get the job done right.
ACKNOWLEDGMENT
The author would like to thank David L. Carlson, DDS, who was the clinician on this case, and David Schubert, DDS, for his generous donation of the natural teeth used for the study.
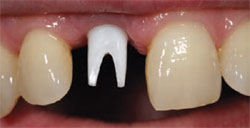 | 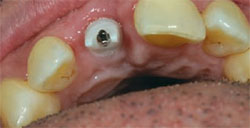 |
| Figure 1 A milled zirconium implant abutment was fabricated to ensure maximum esthetics. | Figure2 An incisal view of the zirconium abutment. There is enough room facially for the framework and porcelain to give high esthetics and a better shade match. The amount of porcelain applied to the framework gives the color and blending necessary for the restoration to be natural-looking. |
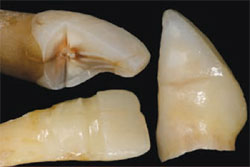 |  |
| Figure 3 To lead to the understanding of how to create a natural-looking tooth, the technician conducts ongoing studies of the internal makeup of a tooth. Extracted teeth, such as those pictured, can be sectioned and modified. | Figure 4 The same thing can be done with crowns made of different materials. Porcelain layering replicates the natural tooth structure. The framework will also affect the appearance. |
 | 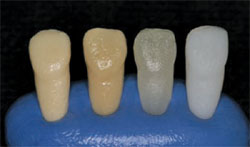 |
| Figure 5 Different color applications or modifiers will have a dissimilar effect on the crown’s final color. Here we can see how several modifiers on top of natural teeth will change the color of the restoration according to their arrangement. | Figure 6 The technician tests the porcelain system by making and firing sample tabs in the laboratory. The sample tabs (left to right) are made of: opacious dentin, dentin, translucent, and enamel. |
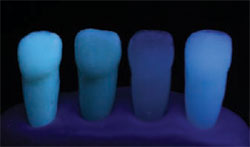 | 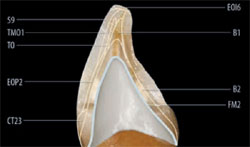 |
| Figure 7 Under ultraviolet lighting, the sample tab’s appearance should be checked for translucency. | Figure 8 After the patient comes in for his custom shading appointment, a custom-made computer shade map is completed and a GC Aadva coping is made for the understructure using the GC Initial™ ZR (GC America, Inc, Alsip, IL) porcelain technique. |
 |  |
| Figure 9 The GC Aadva coping is checked on the model. | Figure 10 A soft zirconia coping without internal color is highlighted on the left. On the right is the view after porcelain and stain are applied to mimic a specific color. |
 |  |
| Figure 11 Following the computer-generated custom shade-mapping chart in Figure 8, multiple layers of porcelain are applied. | Figure 12 A facial view of the crown, placed on the master model, after the first bake. |
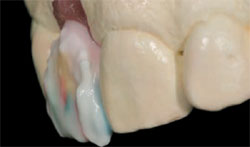 |  |
| Figure 13 A side view after the second buildup with translucent modifier applied. | Figure 14 The second bake produces these results. |
 |  |
| Figure 15 The final porcelain layer with translucency modifier is applied. | Figure 16 Silver powder is applied to the facial surface of the restoration and the tooth to be matched so that the surface texture can be checked. |
 |  |
| Figure 17 A final zirconia crown on the left, with a tooth made from model stone on the right further supports texture check. | Figure 18 The crown is tried in the mouth to check color and shape. |
 |  |
| Figure 19 The finished crown, immediately after cementation. | Figure 20 There is good color agreement, inclination and symmetry between the two centrals when we look at this immediate postoperative shot. |
 | |
| Figure21 A side view shows natural harmony and blending. |
| About the Authors | |
 | Luke Kahng, CDT Founder and Owner LSK121 Oral Prosthetics Naperville, Illinois nluke@lsk121.com |

